Test a data filter - Google Analytics 4
In this post, I describe how to test a data filter in Google Analytics 4.
A data filter should be tested before it is activated, as described by Google:
"Filter changes are by nature destructive and irreversible. They are also not retroactive. You should only enable this if you have already successfully tested your filter. Learn more about filterting out internal traffic"
If you've not yet created a data filter, see my previous post to learn how to Filter out and exclude internal traffic in Google Analytics 4
Resolution
Note: A data filter can take between 24 - 36 hours to apply so you may need to wait before you can test it.
Below are two ways to test a data filter.
Realtime Report
1. Under Reports, click Real-time
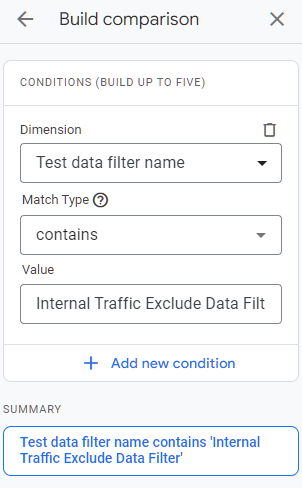
2. Above Realtime overview, click the Add comparison + button
3. Google Analytics includes a Dimension called Test data filter name for the purpose of testing a data filter. Select this in the Dimension drop down on the right e.g. by typing Test:
4. Select a Match Type e.g. contains
5. Enter a Value. This must contain the data filter name you previously created e.g. Internal Traffic Exclude Data Filter
6. Press the Apply button7. In another tab, visit your website
8. The realtime data should now show your visit. If it does not, you may need to wait until your data filter is applied. This can take 24 - 36 hours.
Free-form Exploration
This is the method described by Google here: https://support.google.com/analytics/answer/10104470?sjid=16734620228373057267-EU
1. On the right, click Explore
2. Choose Blank to create a new exploration
3. Variables must be added on the left before they can be selected under Settings. Under Variables, click Dimensions + then search for Test and select Test data filter name.
4. Click the Import button
5. Click Dimensions + again then search for and select Event name then click the Import button
6. Click Metrics + then search for and select Event count then click the Import button
7. Now the Variables are added, we can select the Settings. Under Rows in the Settings column, click Drop or select dimension then select Test data filter name
8. Do this again and select Event name
9. Under Values in the Settings column, click Drop or select metric then select Event count
10. I changed Show Rows to 500 and you can see the Internal Traffic Exclude Data Filter in the results. If your data filter is not visible, under Filters, click Drop or select dimension or metric, select Test data filter name, select match type contains then enter your data filter name in the expression text box e.g. Internal Traffic Exclude Data Filter then press the Apply button.


Comments
Post a Comment