Open a Microsoft Excel spreadsheet xlsx file as read only
In this post, I describe how to open a Microsoft Excel Worksheet as read only.
This can be useful if you want to open a Microsoft Excel Worksheet on a shared folder without preventing another user from being able to edit the same spreadsheet.
I'm using Windows 10 and Microsoft Excel 2019.
Resolution
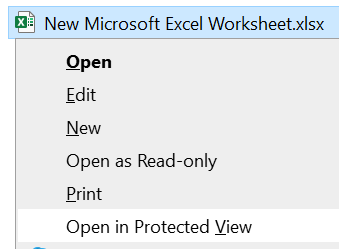
To open a Microsoft Excel spreadsheet as read only, in Windows Explorer, hold the SHIFT key on the keyboard then right click the xlsx file to reveal some additional options:
On my computer, Open as Read-only did not open the Worksheet as read only.
However, Open in Protected View allows you to view the spreadsheet whilst also enabling another user to edit that spreadsheet.
Open Read-Only
You can force Excel to open a Worksheet as read only by:
1. Open Microsoft Excel.
2. Go to Open then Browse.
3. Navigate to the Worksheet you want to open, single click the file to select it then click the down arrow to the right of the Open button:
4. Click Open Read-Only.
Excel shows it is open as read only by including the text [Read-Only] in the title:


Comments
Post a Comment