Remove a hard drive from 2014/2015 Sky box
This post describes how to remove the hard drive from a new Sky+ HD box (2014/2015).


It turned out to be trickier than I expected and I couldn't find much on the Internet to help so thought I'd write a quick post.
Firstly, you need to remove the two grey plastic panels on the sides. This is done by removing the two screws on the far left and right at the back. Once these screws are removed, if you look under the box, you can see a piece of black plastic that can be lifted and a triangle shaped gap:

So, whilst lifting the black plastic with your finger, put a flathead screwdriver into the triangle shaped gap and lever the grey plastic backwards so it slides out.
Next, you need to remove the black plastic casing. To do this, remove the two screws in the deep black holes on the bottom of the box (near the piece of black plastic that can be lifted). Once these are out, locate another piece of black plastic that can be lifted on the bottom, towards the front in the middle (it's about an inch wide and easy to find). You should then be able to lift the entire metal case out of the black plastic.
Now it's time to remove the top. This involves twisting the small pieces of metal around the edges that are holding it on. Pliers are the best tool for this. You then need to use a flathead screwdriver to to unclip the top away from the piece of metal at the back then take the top off completely.
The hard drive is now visible but there is still plenty to do. Start by removing the chips on the front and top of the box. You need to twist the metal and align it with the gaps to do this. Once removed, you can take out the screws on one side of the hard drive.
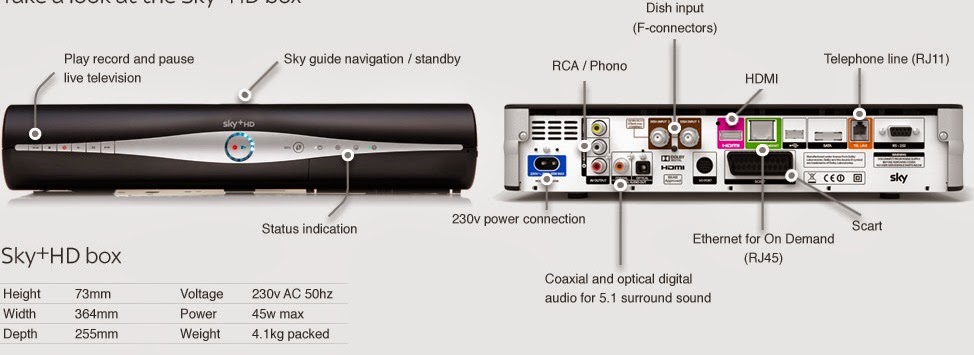
To get to the screws on the other side, you need to remove the metal panel at the back. This is held on with plenty of screws including two next to the VGA port and two bolts around the dish input F-connectors.
Once the back is off, you can get to the screws on the other side of the hard drive by removing the top chip. Remove the screws then ease the top chip away from the 40 pin connector. With the top chip out of the way, you can remove the screws on the other side of the hard drive, remove the power and SATA cables and remove the disk. Then pull off the attached metal brace.
EDIT: If you plan on putting the box back together afterwards and don't want to touch the fragile 40 pin connector, a safer solution (suggested by Zeke Pliskin in the comments) is to remove the fan on the left hand side. This provides just enough clearance to get in (using a flexi or right-angled screwdriver) and remove the two hard drive screws obscured by the top PCB. Whilst it will take a steady hand and a fair few turns to do this, it is easier and far less likely to break something on the box. It also doesn't require all the screws around the ports at the back of the box to be removed and allows the rear metal panel covering to be left on.
If you're trying this and get stuck because I've missed something please let me know in the comments and I'll add the relevant detail.


Comments
Post a Comment